PCs, Smartphones and other digital devices we use contain all our personal and important data. We cannot bare to lose our data, and to our luck, none of these devices are reliable. They can get damaged or might corrupt anytime, losing our important data in the process. Unfortunately, there is no tool to 100% make sure you will never lose the data. However, if you have lost some important data due to a corrupt system or accidental deletion, then you do have a chance to recover it.
When you accidentally delete data from your system or it gets deleted by any other reason, it is not actually deleted. Instead, it is marked as deleted and hidden from the OS to make it seem like deleted (it is easier to mark than actually delete it). With time, this invisible data gets rewritten when you add more data. This means, if you haven’t added any more data, then you can still recover it using a dedicated recovery tool.
To help you recover your deleted data, we have created this list of best data recovery software. Each software has its own unique features with different compatibilities and performance. You can try multiple tools mentioned here (in hopes of recovering), if one tool doesn’t gets the job done.
Note: With the below mentioned tools you will not be able to recover data from SSD. On a SSD, the data is deleted completely to ensure it is faster to rewrite data. So, you are out of luck if you have a SSD. However, If you are using a HDD you still have chances of getting your data recovered. (For recovering data from SSD, there are some expensive methods for which you can take help from Google.)
1. Recuva
Recuva is created by the software developers Piriform, who are also responsible for the popular CCleaner PC cleaning tool. Just like other products, you should also expect attractive interface with high quality. Recuva has a built-in wizard (optional) that guides you through the steps of recovery every time you want to recover data.
You don’t have to do anything, just answer the questions the wizard asks, like data type, area to scan and type of scan, etc. and Recuva will handle rest. Although, normal scan is enough, but you can also deep scan (takes more time) to further increase the possibility of recovering data. You can recover data such as, Pictures, audio (mp3) , documents, videos, compressed files and emails from any storage device Windows can read such as digital camera, Hard disk drive, etc.
Price: Free version (which is enough for data recovery) and a Paid version for $24.95 (advanced file recovery, virtual hard drive support, automatic updates, premium support).
Compatibility: Windows XP, Vista, 7, 8, 8.1
2. Wise Data Recovery
Wise Data Recovery tool is not one of the most feature rich or customizable software. It comes with a clean interface with very few options to tweak. This might make it a bit limited, but for a quick job, this tool is perfect.
All you need to do is launch the tool and select the drive which you would like to scan (removable drives included). The software will quickly scan (very quick as compared to many) the drive and show you all the data that can be recovered such as deleted photos, documents, videos, emails etc. It also comes with a portable version to keep it with you all the time.
This tool is best for people who want a quick and simple tool to recover data, but it may not be able to recover all the data like other tools can.
Price: Free
Compatibility: Windows XP, Vista, 7, 8, 8.1
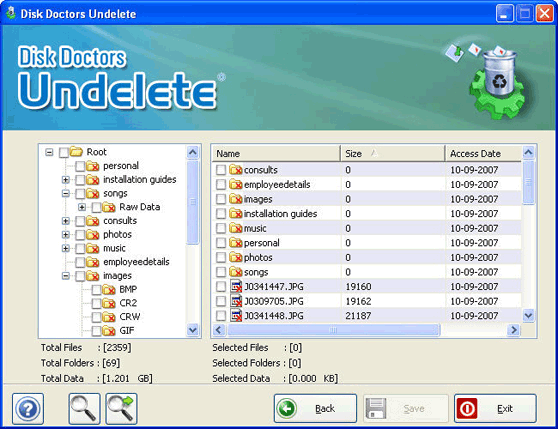
3. Free Undelete
Free Undelete is another easy to use data recovery tool similar to Wise Data Recovery. It doesn’t offer any advanced options to customize what type of data you are looking for, all you need to do is scan a drive (removable as well) and see the results.
After scanning, the tool will show all the files that can be recovered, and even show whole deleted folders. You can just open up folders to recover data from them or just recover everything with a single click. You can recover, Images, music, documents, videos, emails (from email clients) and compressed files.
Price: Free for personal use and Paid for Corporate use costing $69 and $103 for each version (offers guaranteed customer support).
Compatibility: Windows XP, Vista, 7, 8, 8.1
4. Pandora Recovery
Pandora Recovery is a feature rich tool with tons of customization options and deep scanning capability. It doesn’t have as attractive interface as Recuva, but it is definitely more feature rich and hand holding, making it a light replacement to Recuva. It lets you recover FAT32 or NTFS file system. It also comes with a wizard to guide you through the process and let you choose how you want to scan.
You can scan a type of file, the whole drive or deep scan to look for all the files with most files recovered. You can connect other removable storage devices to scan them as well, and all scanning methods will apply to them. You will also find helping tips to understand what each button do as soon as you need to use them.
Price: Free
Compatibility: Windows XP, Vista, 7, 8, 8.1
5. Minitool Partition Recovery

This is a really amazing tool with very simple yet attractive interface. However, its free version is only limited to 1 GB of data recovery. After that, you will have to upgrade to a paid version. The tool is capable of recovering data from formatted, damaged and even deleted partitions with amazing results.
In our experience, the tool did an astounding job of recovering data from a simple drive. It recovered 5 times more files than the other tools mentioned here and divided all the files according to their extensions, making it extremely easy to find the required file. Although, it also took quite some time to scan the drive, but the results were pleasing.
It is a good tool for people who really need some deep scanning and don’t mind paying if they have to (keep 1 GB free data recovery in mind). It supports FAT12, FAT16, FAT32, VFAT, NTFS and NTFS5 file systems.
Price: Free up to 1 GB, after that, paid versions may cost $69 and $89
Compatibility: Windows XP, Vista, 7, 8, 8.1
6. Glary Undelete
Glary Undelete is a simple and lightweight tool with limited features just like some other tools in this list. However, it has some really good filtering options, which you can use to easily find the required files. You only have the option to scan a drive (removable as well) and it will be a quick scan, not a deep one.
You will be quickly presented with all the data that can be recovered categorized by their extensions. Here, you can filter your search according to size, time, state of recovery and file name. Glary Undelete supports Supports FAT, NTFS, NTFS + EFS file systems. It also lets recovery of compressed or encrypted files.
Price: Free
Compatibility: Windows XP, Vista, 7, 8, 8.1
7. UndeleteMyFiles Pro
UndeleteMyFiles Pro offers one of the most recovery features with some handy side features as well. You can separately search for media files or regular files, and if that’s not enough, you can also add filters to look for a specific file. For example, you can add filters to only search for specific file name, extension, size or attribute (like, hidden or read-only, etc.).
Apart from data recovery tools, you can also use “Files Wiper” tool to permanently delete a file or create a “Disk Image” to make sure no deleted files get overwritten by other data. The tool is also quite quick and scans deeply to recover all the files. We found almost twice more files as compared to some quick scan tools mentioned in this list.
Price: Free
Compatibility: Windows XP, Vista, 7, 8, 8.1 and Mac OS X
8. PC Inspector File Recovery

This is a bit advanced tool with very complex use, we will never recommend it to any novice user. It doesn’t have much of a attractive interface or tons of features. However, the tool will let you scan a drive deeply and choose which sectors to scan. A full deep scan of a 40 GB data drive may take more than 2 hours.
The results are also pleasing as the tool will find almost all files that are recoverable. You can also add file name/extension filter to make easier to find a specific file. If you are an advanced user and want to scan your PC deeply, then this PC Inspector File Recovery will do wonders. It supports the FAT 12/16/32 and NTFS file systems
Price: Free
Compatibility: Windows XP, Vista, 7, 8, 8.1
Data Recovery Tools for Smartphones (Android and iPhone)
Although, the above mentioned tools can scan and recover data on smartphones too when connected via USB, but they are not specially made for them. To recover smartphone data like, messages, logs and IM history, etc. you will need to use a separate tool. Check the tools below to recover Smartphone data.
9. Wondershare Dr.Fone

Wondershare Dr.Fone is a renowned data recovery tool for both Android and iOS. It is extremely easy to use with step by step instructions. Using this tool, you can recover Contacts, Messages, Audio, Videos, Photos, Call logs and Whatsapp History. All you need to do is connect your phone to your PC and let the tool do the rest.
However, its support for compatible phones is limited, some supported brands include, Apple, Samsung, Motorola, Sony, LG, HTC and Google Nexus. If your phone is rooted, then it will work on any Android phone, and some supported brands phone may also require root.
Price: Free Trial and a Paid version for $45.95 supporting up to 5 devices or $499 supporting unlimited devices.
Compatibility: Windows 10, 8.1, 8, 7, XP and Mac OS X 10.6-10.10 & iTunes 12.1, iOS 8.3/iOS 9, iPhone 6 and iPhone 6 Plus and upto Android Lollipop
10. EaseUS MobiSaver
his is another great tool for recovering data from Android device or iPhone. The interface, complexity and recovery is almost same as Dr.Fone, the difference comes at supported formats, devices and Price. MobiSaver supports less file types to recover, including SMS, Contacts, Documents, Videos, Audio and Photos. However, it has support for more brands, including Huawei, ZTE and some other Chinese brands.
It is also a bit cheaper, making it a good choice if you don’t need to recover IM history or Call logs. At EaseUs website, you will also find some handy articles to help with recovering data from your Smartphone (the process is a bit complex as compared to PC).
Price: Free version with limited features and a Pro version for $39.95 Android and $30 for iOS version.
Compatibility: Windows XP, Vista, 7, 8, 8.1 and Mac OS X & iOS 8, iPhone 6 and upto Android Lollipop


